
Control Resonant Aberrant Weapons Guide: All Forms, Combos & Upgrades
The Aberrant operates with three Primary forms (Strike for high-speed critical damage, Glaive for 270-degree crowd control, and Cleave for armor-breaking heavy strikes) paired with three Secondary forms (Extend for mid-range chain pulls, Drill for multi-hit Falter buildup, and Crush for kinetic shield ruptures). Upgrade the Strike and Extend forms first using Living Shards inside The Gap to dominate early Manhattan encounters.
Executive Overview: The Shapeshifting Entity
In Control Resonant, Dylan Faden's signature armament is the Aberrant—a sentient, paranatural shapeshifting arm weapon forged from living Astral matter that replaces the Service Weapon wielded by Jesse Faden in the original Control. Transitioning the franchise from a third-person supernatural shooter into a brutal, momentum-based melee action RPG, the Aberrant fluidly morphs between three Primary Forms designed for relentless close-quarters combat and three Secondary Forms engineered for crowd displacement, shield destruction, and rapid posture rupture.
Quick Answer: Fluidly morphing between forms mid-combo is the cornerstone of combat. Initiating with a sweeping Glaive strike staggers peripheral enemies, while instantly chaining into an Extend chain pull drags fleeing snipers directly into melee range. Invest your first 50 Living Shards in The Gap into the Strike Critical Surge node before upgrading Secondary forms.
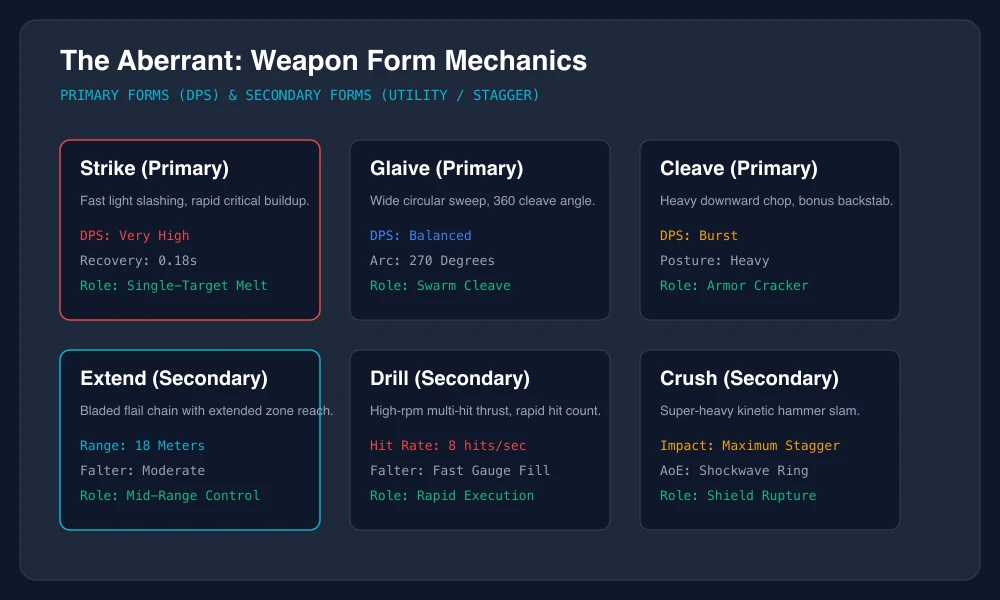
Complete Aberrant Weapon Forms: Parametric Analysis
Every form of the Aberrant possesses unique frame data, Power generation rates per successful hit, and specific stagger multipliers against enemy Falter meters.
| Form Name | Category | Base Damage | Attack Speed (Frame Delay) | Power Gen / Hit | Posture Falter Rating | Tactical Archetype |
|---|---|---|---|---|---|---|
| Strike | Primary | 115 (Fast Light) | 0.18s (Fastest) | +8.5% | Moderate (45) | Twin resonance glass daggers; high-speed single-target shredding. |
| Glaive | Primary | 145 (Wide Sweep) | 0.32s | +6.0% | High AoE (80) | 270-degree curved energy polearm; crowd clearing and mob zoning. |
| Cleave | Primary | 230 (Heavy Chop) | 0.55s | +12.0% | Extreme (160) | Two-handed executioner blade; ignores 35% frontal armor resistance. |
| Extend | Secondary | 90 (Chain Whip) | 0.28s | +5.0% | Pull / Knockdown | 18-meter segmented chain whip; snatches aerial targets and pulls runners. |
| Drill | Secondary | 42x6 (Burst) | 0.40s | +9.0% | Maximum Falter (210) | Rapid spiraling vortex; melts enemy guard meters in under 1.5 seconds. |
| Crush | Secondary | 280 (Shockwave) | 0.70s (Slowest) | +15.0% | Heavy Stun (240) | Massive gravity maul; shatters crystalline kinetic barriers instantly. |
Primary Forms: Combat Fundamentals & Execution
1. Strike Form (Twin Crystalline Daggers)
The Strike form functions as Dylan's primary duel-wielding posture. Operating with virtually zero animation recovery, it allows players to weave light attacks between enemy swing telegraphs.
- Intrinsic Trait: Harmonic Resonance: Connecting four consecutive Strike hits without taking damage increases critical hit chance by 25% for 6 seconds.
- Optimal Target: High-mobility rogue entities, Hiss distorted stalkers, and boss vulnerability windows.
2. Glaive Form (Sweeping Astral Halberd)
The Glaive is Dylan's primary crowd control implement. Its wide sweeping animations hit enemies in a generous arc surrounding his character model.
- Intrinsic Trait: Vortex Cleave: The third light attack in the Glaive sequence pulls loose debris and surrounding lightweight enemies toward Dylan's center of mass, setting them up for immediate explosive ability detonations.
- Optimal Target: Swarms of corrupted Manhattan civilians and airborne resonance leeches.
3. Cleave Form (Greatsword Executioner)
Cleave trades agility for raw, crushing impact force. While its windup frames are deliberate, each blow staggers even elite brute archetypes.
- Intrinsic Trait: Severing Momentum: Landing a killing blow with Cleave refunds 50% of the stamina consumed and grants a temporary 20% kinetic damage shield.
- Optimal Target: Heavy FBC Enforcers and crystalline aberrant guardians.
Secondary Forms: Utility, Displacement & Guard Rupture
1. Extend (Segmented Astral Whip)
Hold your secondary input to transform the Aberrant into an extended 18-meter segmented whip.
- Mechanical Value: Tapping light attack with Extend pulls distant snipers on ledges directly to Dylan's feet. Holding heavy attack lashes out in an expansive 360-degree radius, tripping surrounding ground troops.
2. Drill (Rotational Posture Grinder)
The Drill form channels localized telekinetic friction through a rotating tip.
- Mechanical Value: Ideal against shielded bosses. Holding the attack button channels continuous multi-hit damage that rapidly fills the enemy's Falter gauge, triggering cinematic execution states without needing to chew through their raw health pool.
3. Crush (Kinetic Gravity Maul)
Dylan channels high-density dark matter into a towering warhammer.
- Mechanical Value: Delivers the highest single-hit posture damage in the game. Jumping from elevation and unleashing a Crush slam creates an expanding shockwave that topples all enemies within an 8-meter radius.
Morph-Combo Chains: Advanced Flow State Playbooks
The hallmark of skilled play in Control Resonant is the execution of seamless Morph-Combos—switching weapon forms mid-animation to cancel recovery frames and compound status effects:
Morph-Combo 1: The Sweeping Harpoon (Crowd Annihilation)
Step 1: Glaive Light Attack (Sweep 1) -> Hits peripheral cluster (+6% Power).
Step 2: Glaive Light Attack (Sweep 2) -> Knocks enemies off balance.
Step 3: Morph Input + Extend Heavy -> Chains latch onto the most distant runner, pulling them in.
Step 4: Morph Input + Strike Light (x3) -> Executes high-speed critical puncture.
Execution Benefit: Zero recovery frames; transitions cleanly from 360 AoE to single-target focus.

Morph-Combo 2: The Guard Breaker (Anti-Elite & Boss Stagger)
Step 1: Sprint Jump -> Morph into Crush Overhead Slam -> Shatters exterior kinetic guard.
Step 2: Immediate Morph into Drill Heavy -> Channels 6 continuous ticks, overloading Falter gauge.
Step 3: Dylan prompts Execution [Interact] -> Cinematic decimation restores 40% Power and Health.
Living Shards Economy & The Gap Upgrades
Upgrading the Aberrant requires Living Shards—crystalline resonance remnants extracted from vanquished Aberrant entities across Manhattan and forged within The Gap (Remedy's astral hub safe zone).
Aberrant Upgrade Tiers
| Upgrade Tier | Required Living Shards | Astral Catalyst | Unlocked Weapon Modification |
|---|---|---|---|
| Tier 1 (Harmonic) | 25 Common Shards | None | Unlocks Form Swapping during light combo chains. |
| Tier 2 (Resonant) | 50 Refined Shards | 1 Threshold Core | +15% Base Damage across all Primary Forms. |
| Tier 3 (Aberrant) | 100 Refined Shards | 2 Astral Cores | Unlocks Secondary Form Combo Finishers. |
| Tier 4 (Astral) | 200 Pure Shards | 1 Black Rock Prism | Adds a second Astral Mod socket to all forms. |
| Tier 5 (Transcendent) | 350 Void Shards | 1 Resonance Singularity | Critical hits instantly generate double Power meter charge. |
Weapon Combat Anti-Patterns & Common Mistakes
- Over-Committing to Cleave Animations in Swarms: The Cleave greatsword has a 0.55-second windup. Attempting to use Cleave while surrounded by five fast-moving leeches leaves Dylan vulnerable to interrupt staggers. Always switch to Glaive or Strike when swarmed.
- Ignoring the Falter Meter: Attacking an enemy's raw health bar with Strike while their guard is active takes 3x longer than using Drill or Crush to break their posture and triggering an immediate instant-kill Execution.
- Neglecting Form Mod Synergy: Equipping damage mods onto the Extend whip is inefficient. Equip status-inflicting mods (such as Stagger Amplification or Pull Gravity) onto Secondary utility forms, reserving raw Critical and Damage mods for Primary forms.
Frequently Asked Questions
Can I equip more than one Secondary Form at a time?
Dylan can equip one Primary Form and one Secondary Form to his active loadout simultaneously, accessible via a single-button morph toggle. You can reconfigure your active form pairing at any Control Point or inside The Gap safe hub without penalty.
How do Living Shards differ from standard Astral Crafting Materials?
Astral Materials are utilized for talent tree progression and personal defensive enhancements. Living Shards are exclusive biological resonance components required specifically to evolve the physical forms and kinetic lethality of the Aberrant weapon itself.
Does dodging cancel weapon swing animations?
Yes. Dylan's Paranatural Dodge can interrupt light attack swing recoveries instantly. However, heavy attacks with Cleave and Crush possess an un-cancelable 0.2-second commitment window during the downward swing.
To synergize these weapon forms with Dylan's psychic talent trees, consult our Combat Abilities & Talent Builds Guide. For step-by-step boss mechanics utilizing the Drill form, review The Artist Boss Fight Strategy.